
Free Samsung MDM Removal method revealed! Tested working 100% on Galaxy A235F on Android 13. Samsung MDM Removal can be difficult, we make it free & easy. Bypass Galaxy MDM lock with 1024kb.co.nz
What Is Samsung MDM Removal?

MDM is the acronym for Mobile Device Management, a set of policies applied remotely to a fleet of company devices or to by finance houses to devices bought on time payment. Policies applied via MDM can limit use of the phone in a wide variety of ways – only recognised email address, only a set of approved apps can be installed, cannot turn location services off, can’t change wallpaper, cannot factory reset – any action possible on the phone can be limited or controlled by the MDM policy.
MDM policy is set by individual company IT departments when they purchase a MDM service from an MDM service provider. Usually tied to the IMEI number, the policy will kick in when the newly-enrolled phone is being set up. When the IMEI hits the internet, an alert is sent & the MDM policy applied, overriding the standard set-up procedure.
Devices – phones & tablets (Android & iOS), laptops (Windows & Mac) – are enrolled remotely through the MDM service provider’s fleet management dashboard. MDM release is also done from here too, usually following a request to IT Department. When a company goes out of business, for example, or has a sudden change of IT staff, the existing MDM policy can become troublesome. Unsuspecting buyers find that the device that they intended to use can’t be used & that there’s no obvious way around this issue.
Because you cannot immediately tell that a device is subject to MDM control, & that the policy sneaks in invisibly during setup, a successful Samsung MDM Removal method is becoming a popular Google search term.
Mobile Device Management Service Providers include companies such as IBM (MaaS360), Microsoft (Intune} and Citrix (XenMobile) amongst other IT industry heavyweights:

 Often company fleet phones aren’t top of the line, the Samsung Galaxy A23 (model SM-A235F) isn’t a flagship by a long shot. Just a functional device that provides the basic services required for modern business.
Like many Android devices of the current generation, it’s Qualcomm powered with 5G capability. The 3 rear camera lenses are there for marketing purposes more than functionality – you’re far better off with one decent lens taking a smaller range of higher quality photos than an entire collection of bang-average images.
Initially I tried reputable published MDM removal methods, most of which took me nowhere as they all relied upon the *#0*# emergency dialler allowing ADB access to the firmware – this was patched out mid 2023. The more sophisticated QR code method was partially successful – but after 5 minutes of celebrating MDM bypass, the phone would lock down again.
Here’s what I did to achieve Samsung MDM Removal and permanent MDM bypass:
You need:
Android 13, not 14 – if your handset is 14 already then check that your bootloader image version matches a Tiramisu firmware & download that – 5GB or so. Samsung Odin – get it here TWRP custom recovery specific to your handset – from TWRP.me Unlocking app with QR code generator function such as TFT Unlocker (it’s free.)Introduction:
As with most new-ish Samsung phones, Android 14 was the installed OS. There’s always difficulty modifying newly-released firmware so I was relieved to find that the A23 firmware with bootloader v4 (you can’t downgrade bootloader versions) comes in 2 versions – Android 13 (code name Tiramisu) & Android 14 (Upside Down Cake.First Step:
Download Samsung A23 Tiramisu firmware then put the A23 into Download mode & reinstall the downgrade firmware. To remove any existing traces of the MDM policy, select NAND Erase in Odin, meaning that all existing partitions would be destroyed & rewritten. If you mess this procedure up & need to start again, you absolutely need to redo this Step – wiping all traces of the MDM profile – all over again. Also, search & download the PIT (Partition Information Table) for your Galaxy, this tiny (20kb) file will enable the reinstall to fit correctly.QR Code:
The QR code method that was partially successful seemed worthy of continuing with, just applying some alternative & aggressive action before the MDM policy was able to take over. QR codes are used by MDM service providers as a method of delivering initial policy commands. By hijacking the QR code, we tell the device to use a less restrictive policy set that gives us the opportunity to quickly access Developer Mode & the system-wide modifications that ADB brings. There are a few apps that will generate a QR code for you, following the steps will get that magic USB debugging approval window: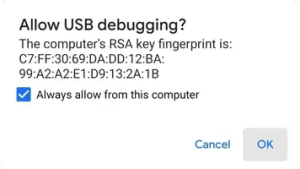 Several times I’d gotten ADB happening only for the full MDM policy to arrive after an app-imposed reboot & start locking things down again. *sigh* Rinse & repeat.
To generate the hijacked QR code I used Griffin (paid app), but Unlock Tool (also paid), TFT Unlock (free & linked above) & KG Unlock QR Generator (also free) all have the same method built in, as do several other phone repair apps.
Several times I’d gotten ADB happening only for the full MDM policy to arrive after an app-imposed reboot & start locking things down again. *sigh* Rinse & repeat.
To generate the hijacked QR code I used Griffin (paid app), but Unlock Tool (also paid), TFT Unlock (free & linked above) & KG Unlock QR Generator (also free) all have the same method built in, as do several other phone repair apps.
Setting The Trap:
The real modified Samsung MDM Removal action starts here. After ticking “Always allow from this computer” hit OK button (see image above), halt the app progress by pulling the USB cable from the handset. Now there’s no more pointless rebooting & losing ADB access, thank you very much. Part of the QR code generator requirement is that you connect to WiFi – that’s precisely where the original MDM policy lock will come from – so time is of the essence here – act quickly to get the next step done. The phone is now at the desktop – without any accounts signed in. You could turn WiFi off right now but our next (vital) step requires data connection. Go Settings / About / Software Information / Build Number – tap 7 times to activate Developer Mode. Go back twice until you see Developer Mode tab, press to enter that. OEM Unlocking is the vital option here – you won’t see it unless you’re internet-connected. Turn that on. Also switch on USB Debugging – if it’s available. Now turn your WiFi off, then power the phone down. The trap is set, we can now modify the factory firmware.Let’s Do This:
 Reboot into Download mode directly (not via Recovery / reboot Bootloader) – Hold the Volume switch down in the centre – so both Vol + & Vol – are pressed, along with the Power button then insert the USB cable, release Power, release Vol switch. The Download mode must show as below with Custom OS warning & the option to go into Device Unlock mode by long press on Vol +. Which, of course, is precisely what you do – long press Vol +.
Thanks for the comment. It’s what we do here @ 1024kb, nice to know that you appreciate our work. Next time you’ve got a phone problem, visit us first!
PS: Check the date on the TWRP Recovery post – it’s been a while since I wrote that one. Things have changed, progress & all…
Bro! How did i not find this earlier. Just paid for MDM removal service after sweating it out.
– Had luck with qr code bypass only to have the device auto power off after 5 min
– Thank you for this trick (halt the app progress by pulling the USB cable)
– Device already unlocked though, will try the TWRP trick sometimes in the future (cant risk a relock now)
Thank you for sharing!
This knowledge is awsome. So I have a s23 ultra and everything I’ve tried doesn’t work the mdm won’t let me access dev options, factory reset, flash with odin. It says mdm mode can’t erase user data and something about the pit file. Anyways I’m going to try this and see if I can get it to work fingers crossed